Table of Contents
Stream’s New Record Screen Option
Announced in a blog post on May 6 (without any notification in the Microsoft 365 admin center), Stream’s new screen recording feature is now available to Office 365 tenants worldwide. The idea is simple. It’s a way to create short (up to 15 minute) videos using content that can be captured from your screen. For example, you might want to record how to do something in an application or, less positively, how to reproduce a bug.
Screen recording works with Chrome (version 74 and above), Edge, and Brave browsers on Windows and MacOS workstations. Safari on MacOS is not supported and audio capture is only available on Windows. Naturally, your Office 365 account needs to be assigned a Stream license to be able to use Stream to capture screen content.
Recording a Screen Capture
To create a record, select Record screen from the Create menu (Figure 1). There’s no way for an Office 365 tenant to remove this option from Stream.

To begin, Stream loads a dialog to allow you to select which camera and microphone to use (Figure 2). You can only capture camera content when recording the entire screen. This might be a limitation of Stream being a web application (pure speculation on my part). In any case, it’s unlikely that you’ll use this facility to capture carefully scripted personal videos. Other and better tools like Techsmith Camtasia or even PowerPoint are available for that kind of production. You can’t apply effects like background blur or a background image when capturing via the camera.

Capturing Screen Content
Click the Start recording button and Stream asks you to select which part of the screen you want to capture (Figure 3). You can choose the complete screen (needed to include the camera), and application window (something like Outlook), or a browser tab.

The selected portion of the screen is shared, and Stream is ready to capture whatever appears once you start recording. Once you press the record button, Stream goes through a brief countdown before recording starts. You can stop and restart the recording at any time to make adjustments, take a break, or skip uninteresting events. The only thing to remember is that the maximum length of the video is 15 minutes. Microsoft suggests that you should break recording up into different videos if you need to record longer segments.
If you select a specific application or window, you can only record from that window. You can’t switch and combine different windows. If you need to capture content from multiple windows, record your entire screen.
Uploading to Stream
When the information you want to capture is complete, click the record button again to stop recording. You can now play back what’s been captured to check that it’s acceptable. For example, you might check that the sound levels are OK and everything you need is in the video. If everything’s OK, click Upload to Stream to release the captured content to Stream for further processing. As is normal for Stream videos, you’re asked to enter a name, description, and language for the video (Figure 4). You can also amend the permissions to restrict access to the video when it’s available in Stream.

Processing and Playback
Two choices are available to saving the video in Stream. You can:
- Save as draft: The video is saved and accessible in Stream under My Content > Videos. You have the chance to update video metadata, permissions, or trim the video if necessary to remove unwanted content from the start and end of the video. When you’re ready to make the video available to a wider audience, you can set the permissions to allow access for the entire organization to restrict it to certain groups or channels.
- Publish: This action makes the video available immediately to “everyone in the company.” If you don’t want everyone to be able to view the video, uncheck the box before publication. A Go to Video link takes you to the uploaded video.
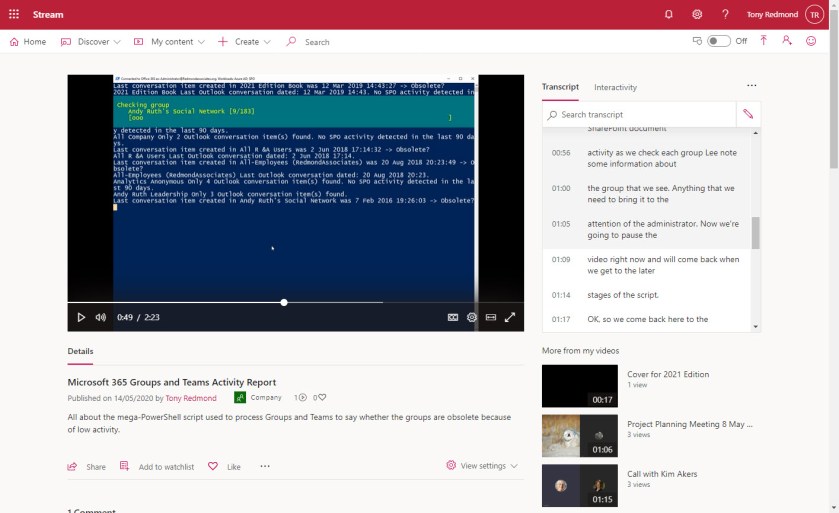
Screen captures are usually short, so they should be available in Stream soon after publication. Once processing finishes, the video can be played back (Figure 5). Playback proceeds like other videos uploaded to Stream. However, I found that processing didn’t generate the automatic transcript available for other recordings, like those for Teams meetings, even after setting the video language during the upload process (you can see this done in Figure 4). The solution is to update video details in Stream to set the language. Stream will then create the transcript. I’m sure this is a bug that Microsoft will fix quickly.
It’s easy to make the video available to other people from Stream by creating a link and sharing it via email or Teams (as a link pasted in a message or to create a channel tab).
Example Recording
As an example, I recorded a screen capture to show how to run the Microsoft 365 Groups and Teams activity report PowerShell script. There’s some interference in the capture right at the start. It’s a good idea to wait for a couple of seconds at the start of a recording to let everything settle down before beginning to speak or record content. You can always trim the excess content after uploading a video. In this case, I couldn’t trim because of the voiceover. Oh well, better luck next time.
Here’s the screen capture video that I recorded.
Screen capture in Stream is a small feature that’s a great example of things that can slip through the cracks and remain unnoticed. Stay updated by subscribing to the Office 365 for IT Pros eBook.
by settng the language (e.g. to English) in the “Update Video Details”, it will generate the transcript, if you want it.
Interesting… I set the language to English when uploading the video but Stream didn’t take that value. I’ve updated the language to English now and will see how long it takes for Stream to generate a transcript. Stay tuned.
Great. Updating video details worked. However, after testing several times, it seems that Stream ignores the language set when a recording is uploaded for processing.I have updated the post…
Why is this not working on my Mac? I hit record screen and nothing happens
I have no idea. I have never tried to use the feature on a Mac.